Last week I shared all of the “before” pics of our Retro Ranch Reno, now I’m back to show you some of our progress pics!
Here is where we started with the kitchen:

I posted pictures of the cabinets on Craigslist, and offered them for free to anyone who was willing to come and take them out. Thankfully someone stepped up and spent two full days tearing out cabinets. It was nice to save that work. Once they got what they wanted we were left with just the few cabinets in the picture.

I was pleasantly surprised to find drywall under the soffits! Next the drywall repair started. Thankfully the new cabinets and backsplash will cover most of the drywall so I didn’t have to worry about being too much of a perfectionist in here. The ceiling was what really mattered.
Next came the demo of the wall between the living and dining room. Jack got to take the first hit, and thought it was pretty awesome getting to help tear down walls.

This is the “before” of that wall. With a closet blocking off the kitchen, and a wall closing off the dining room.

After getting all the drywall down we discovered that it wasn’t a load bearing wall, but that it did support the ceiling. This meant that we had to put in a header to hold the load of the ceiling. Thankfully it could be a small header because it didn’t have to support the load of the entire house.

My dad was in town so he gave us a hand with the header. He also went up in the attic to help us move electrical lines. 
We decided to keep a little wall between the dining and living room because when the door is open it is blocked anyways. It also gives us a spot to put some type of corner cabinet or banquette in the dining room, and coat hooks in the living room.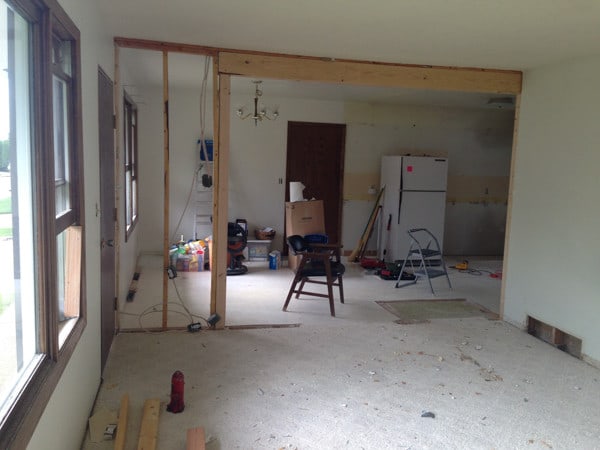
Now we’re in the drywalling stage. Drywall may be one of my least favorite DIY’s, but it has to get done. Just this morning I put the 3rd coat of mud on and I’m hoping it will be the last!
Here is the “before” view from the kitchen into the living room. Basically just a shot of the closet and door to the basement.

Here is the view standing at the same place in the kitchen now! So much better! You can see from this angle that we decided not to mess with drywalling the inside of the opening. Instead I’ll trim it out something like how I did on our last house’s opening.

For a few days we had a pretty big mess on our hands.

We decided not to get a dumpster, which means we’ve been making almost daily trips to the dump. Currently though it’s only cost us $12 to get rid of everything!

Here’s another shot into the living room, with the new header and eliminated closet. 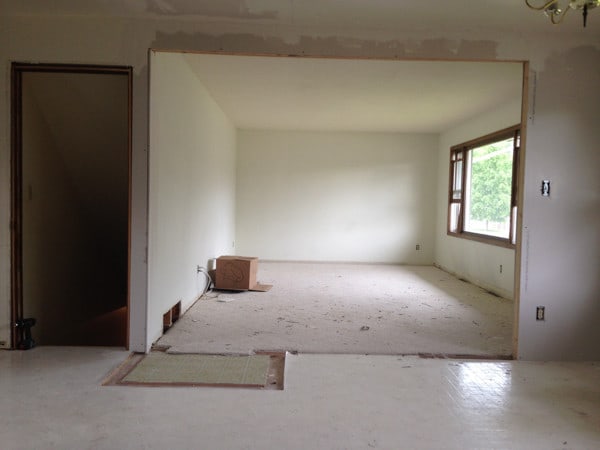 Along with demo and drywall, we’ve also spent a TON of time removing wallpaper. Even Mason got in on the action! He parked his folding chair in front a wall one afternoon and actually made some progress! He looks thrilled doesn’t he?! Really though he chose to do it!

My dad also got in on the wallpaper peeling action. So far we’ve probably got 4 hours invested into wallpaper removal and we’ve only got about 1/4 of it off. I’m actually considering planking a wall to avoid having to tear anymore wallpaper off!

Because we are without a kitchen during this process, we set up one of the bedrooms as our “kitchen”. We’ve got a griddle, toaster, and microwave. I’m getting pretty desperate on making just about anything possible in a microwave. It’s really not fun washing dishes in the nasty bathroom sink though, so we’ve spent FAR too much eating out lately. Hopefully we’ll get the kitchen put together to a usable point this week!
 So there it is! Some days it doesn’t feel like we’re making much progress, but considering we’ve only owned the house for 2 weeks we’re actually doing pretty good. On our list for this week is:
-Finish wallpaper removal
-Texture Kitchen Ceiling and Walls
-Wire oven cord
-Add water line for fridge and dishwasher
-Paint windows
-Get cabinets from MN and install
-Install appliances
-Hook up kitchen sink?!? (First I need to find one!)
Until then anyone have any good suggestions for meals you can cook in a microwave that require minimal dishes? Or any other tips for surviving without a kitchen!? Hopefully it’s not much longer!
It’s gorgeous outside! Grill! You can grill just about anything, or use the grill to bake things. I do it all the time in aluminum pans when we want potatoes or whatever on the side for supper and I’m starting the grill anyway. Our house has very little for AC so the really hot days I cook almost anything on the BBQ. And if you really don’t want to wash your aluminum pans, don’t; just toss and use a new one the next day. Just a thought for food…
I’ve avoided grilling because of the dishes, but you’re totally right, I should just grab a stack of foil pans. Thanks for the idea!
Wow!! You’ve made such good progress!!!! It’s going to be so awesome!! Poo about all the wallpaper….no fun ever!
Thank you! We’ve been working so hard, I sure hope it turns out awesome.